【前端】网页悬浮窗口
网页悬浮窗口
需求场景
- 项目中集成了设备取数的功能,而在和设备取数现场人员对接的时候,发现设备无法绑定样品,也无法实时取数,所以设备获取到的数据就会不定时的通过接口保存到项目的数据库中。而在软件系统中,需要能获取到设备取数的数值,然后填写到对应的输入框。
- 之前我的做法是通过实时数据来获取设备取到的数据,这种方法并不够严谨。之后遇到这个不定时取数的问题,就可以连同之前的问题也进行优化。
- 在代码层面的需求应该是:
- 可以展示设备取数数据
- 可以选择数据,并填写到输入框内
- 不影响其他地方的操作,即设备取数和其他功能应该是相互独立,互不影响的
- 符合操作习惯,易于操作
解决构想
首先,弹出层
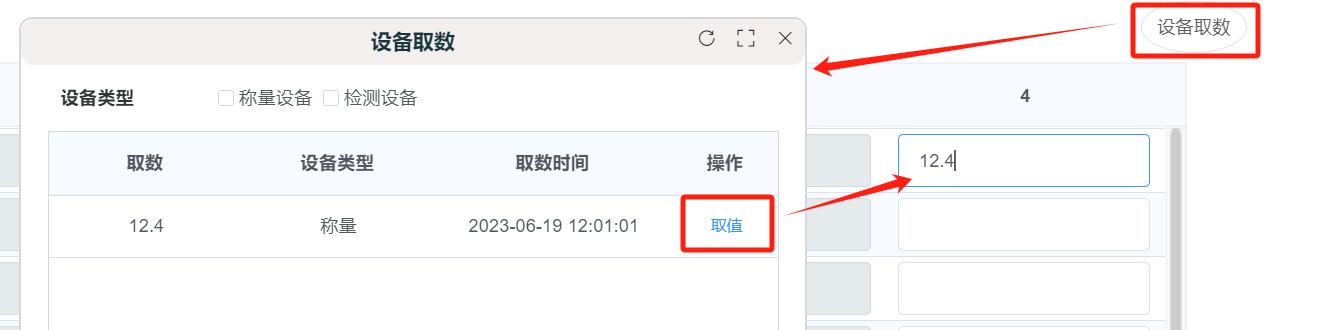
el-dialog应该是无法满足这个需求的,因为弹出层组件会在弹出层弹出后,其他地方都会无法操作,只能操作弹出层之内的内容。所以我就寻思自己写一个组件,来实现既展示了设备取数数据,又可以操作其他地方。我在别的系统中曾看到过类似的功能,是通过一个悬浮按钮【设备取数】,点击后会弹出一个悬浮窗口,里面展示的是设备取数的列表数据,可以获取到该功能开启后取到的所有数据,可以自行选择,然后选中的数据会自动填写在输入框内。
所以我想着可不可以类似这样做两个组件,一个是悬浮按钮,另一个是悬浮窗口,这样应该可以满足以上需求。
构想:
- 做成两个可复用的公共组件,一来需要在不同页面复用,二来以后有类似需求可以接着改进复用
- 做成悬浮窗,与页面相互独立,不会互相影响
- 需要可以拖拽移动位置,可以手动调节悬浮窗口的大小,防止遮挡页面内容
最终成果图
三、技术实现
(一)悬浮窗口组件
悬浮窗口组件是整个功能的核心,需要实现拖拽、调节大小、悬浮显示等功能。
1. 组件结构
<template>
  <div
    v-if="visible"
    ref="floatWindow"
    class="float-window"
    :style="windowStyle"
    @mousedown="handleMouseDown"
  >
    <!-- 窗口头部 -->
    <div class="window-header" @mousedown="startDrag">
      <div class="window-title">{{ title }}</div>
      <div class="window-controls">
        <button class="control-btn" @click="minimize">-</button>
        <button class="control-btn" @click="close">×</button>
      </div>
    </div>

    <!-- 窗口内容 -->
    <div class="window-content">
      <slot></slot>
    </div>

    <!-- 调节大小的控制点 -->
    <div class="resize-handles">
      <div class="resize-handle resize-n" @mousedown="startResize('n')"></div>
      <div class="resize-handle resize-s" @mousedown="startResize('s')"></div>
      <div class="resize-handle resize-w" @mousedown="startResize('w')"></div>
      <div class="resize-handle resize-e" @mousedown="startResize('e')"></div>
      <div class="resize-handle resize-nw" @mousedown="startResize('nw')"></div>
      <div class="resize-handle resize-ne" @mousedown="startResize('ne')"></div>
      <div class="resize-handle resize-sw" @mousedown="startResize('sw')"></div>
      <div class="resize-handle resize-se" @mousedown="startResize('se')"></div>
    </div>
  </div>
</template>

<script>
export default {
  name: 'FloatWindow',
  props: {
    title: {
      type: String,
      default: '悬浮窗口'
    },
    initialWidth: {
      type: Number,
      default: 400
    },
    initialHeight: {
      type: Number,
      default: 300
    },
    initialX: {
      type: Number,
      default: 100
    },
    initialY: {
      type: Number,
      default: 100
    },
    minWidth: {
      type: Number,
      default: 200
    },
    minHeight: {
      type: Number,
      default: 150
    },
    visible: {
      type: Boolean,
      default: true
    }
  },
  data() {
    return {
      // 窗口位置和大小
      x: this.initialX,
      y: this.initialY,
      width: this.initialWidth,
      height: this.initialHeight,

      // 拖拽状态
      isDragging: false,
      dragStartX: 0,
      dragStartY: 0,
      windowStartX: 0,
      windowStartY: 0,

      // 调节大小状态
      isResizing: false,
      resizeDirection: '',
      resizeStartX: 0,
      resizeStartY: 0,
      resizeStartWidth: 0,
      resizeStartHeight: 0,
      resizeStartLeft: 0,
      resizeStartTop: 0
    }
  },
  computed: {
    windowStyle() {
      return {
        left: this.x + 'px',
        top: this.y + 'px',
        width: this.width + 'px',
        height: this.height + 'px'
      }
    }
  },
  mounted() {
    // 添加全局事件监听
    document.addEventListener('mousemove', this.handleMouseMove)
    document.addEventListener('mouseup', this.handleMouseUp)
  },
  beforeDestroy() {
    // 移除全局事件监听
    document.removeEventListener('mousemove', this.handleMouseMove)
    document.removeEventListener('mouseup', this.handleMouseUp)
  },
  methods: {
    // 开始拖拽
    startDrag(e) {
      e.preventDefault()
      this.isDragging = true
      this.dragStartX = e.clientX
      this.dragStartY = e.clientY
      this.windowStartX = this.x
      this.windowStartY = this.y
    },

    // 开始调节大小
    startResize(direction) {
      this.isResizing = true
      this.resizeDirection = direction
      this.resizeStartX = event.clientX
      this.resizeStartY = event.clientY
      this.resizeStartWidth = this.width
      this.resizeStartHeight = this.height
      this.resizeStartLeft = this.x
      this.resizeStartTop = this.y
    },

    // 鼠标移动处理
    handleMouseMove(e) {
      if (this.isDragging) {
        this.handleDrag(e)
      } else if (this.isResizing) {
        this.handleResize(e)
      }
    },

    // 处理拖拽
    handleDrag(e) {
      const deltaX = e.clientX - this.dragStartX
      const deltaY = e.clientY - this.dragStartY

      let newX = this.windowStartX + deltaX
      let newY = this.windowStartY + deltaY

      // 边界检测
      const maxX = window.innerWidth - this.width
      const maxY = window.innerHeight - this.height

      newX = Math.max(0, Math.min(newX, maxX))
      newY = Math.max(0, Math.min(newY, maxY))

      this.x = newX
      this.y = newY
    },

    // 处理调节大小
    handleResize(e) {
      const deltaX = e.clientX - this.resizeStartX
      const deltaY = e.clientY - this.resizeStartY

      let newWidth = this.resizeStartWidth
      let newHeight = this.resizeStartHeight
      let newX = this.resizeStartLeft
      let newY = this.resizeStartTop

      // 根据调节方向计算新的尺寸和位置
      switch (this.resizeDirection) {
        case 'n':
          newHeight = this.resizeStartHeight - deltaY
          newY = this.resizeStartTop + deltaY
          break
        case 's':
          newHeight = this.resizeStartHeight + deltaY
          break
        case 'w':
          newWidth = this.resizeStartWidth - deltaX
          newX = this.resizeStartLeft + deltaX
          break
        case 'e':
          newWidth = this.resizeStartWidth + deltaX
          break
        case 'nw':
          newWidth = this.resizeStartWidth - deltaX
          newHeight = this.resizeStartHeight - deltaY
          newX = this.resizeStartLeft + deltaX
          newY = this.resizeStartTop + deltaY
          break
        case 'ne':
          newWidth = this.resizeStartWidth + deltaX
          newHeight = this.resizeStartHeight - deltaY
          newY = this.resizeStartTop + deltaY
          break
        case 'sw':
          newWidth = this.resizeStartWidth - deltaX
          newHeight = this.resizeStartHeight + deltaY
          newX = this.resizeStartLeft + deltaX
          break
        case 'se':
          newWidth = this.resizeStartWidth + deltaX
          newHeight = this.resizeStartHeight + deltaY
          break
      }

      // 应用最小尺寸限制
      newWidth = Math.max(this.minWidth, newWidth)
      newHeight = Math.max(this.minHeight, newHeight)

      // 边界检测
      if (newX < 0) {
        newWidth += newX
        newX = 0
      }
      if (newY < 0) {
        newHeight += newY
        newY = 0
      }
      if (newX + newWidth > window.innerWidth) {
        newWidth = window.innerWidth - newX
      }
      if (newY + newHeight > window.innerHeight) {
        newHeight = window.innerHeight - newY
      }

      this.width = newWidth
      this.height = newHeight
      this.x = newX
      this.y = newY
    },

    // 鼠标释放处理
    handleMouseUp() {
      this.isDragging = false
      this.isResizing = false
      this.resizeDirection = ''
    },

    // 最小化窗口
    minimize() {
      this.$emit('minimize')
    },

    // 关闭窗口
    close() {
      this.$emit('close')
    }
  }
}
</script>

<style scoped>
.float-window {
  position: fixed;
  background: #fff;
  border: 1px solid #ddd;
  border-radius: 6px;
  box-shadow: 0 4px 12px rgba(0, 0, 0, 0.15);
  z-index: 9999;
  user-select: none;
}

.window-header {
  height: 32px;
  background: #f5f5f5;
  border-bottom: 1px solid #ddd;
  border-radius: 6px 6px 0 0;
  display: flex;
  justify-content: space-between;
  align-items: center;
  padding: 0 12px;
  cursor: move;
}

.window-title {
  font-size: 14px;
  font-weight: 500;
  color: #333;
}

.window-controls {
  display: flex;
  gap: 4px;
}

.control-btn {
  width: 20px;
  height: 20px;
  border: none;
  border-radius: 3px;
  background: #e0e0e0;
  cursor: pointer;
  font-size: 12px;
  display: flex;
  align-items: center;
  justify-content: center;
}

.control-btn:hover {
  background: #d0d0d0;
}

.window-content {
  padding: 12px;
  overflow: auto;
  height: calc(100% - 32px);
}

/* 调节大小的控制点 */
.resize-handles {
  position: absolute;
  top: 0;
  left: 0;
  right: 0;
  bottom: 0;
  pointer-events: none;
}

.resize-handle {
  position: absolute;
  pointer-events: auto;
}

.resize-n {
  top: -3px;
  left: 3px;
  right: 3px;
  height: 6px;
  cursor: n-resize;
}

.resize-s {
  bottom: -3px;
  left: 3px;
  right: 3px;
  height: 6px;
  cursor: s-resize;
}

.resize-w {
  left: -3px;
  top: 3px;
  bottom: 3px;
  width: 6px;
  cursor: w-resize;
}

.resize-e {
  right: -3px;
  top: 3px;
  bottom: 3px;
  width: 6px;
  cursor: e-resize;
}

.resize-nw {
  top: -3px;
  left: -3px;
  width: 6px;
  height: 6px;
  cursor: nw-resize;
}

.resize-ne {
  top: -3px;
  right: -3px;
  width: 6px;
  height: 6px;
  cursor: ne-resize;
}

.resize-sw {
  bottom: -3px;
  left: -3px;
  width: 6px;
  height: 6px;
  cursor: sw-resize;
}

.resize-se {
  bottom: -3px;
  right: -3px;
  width: 6px;
  height: 6px;
  cursor: se-resize;
}
</style>
2. 核心功能实现
组件拖拽功能
拖拽功能通过监听鼠标事件实现:
- 开始拖拽:在窗口头部按下鼠标时记录初始位置
- 拖拽过程:监听鼠标移动事件,计算偏移量并更新窗口位置
- 结束拖拽:鼠标释放时停止拖拽
- 边界检测:确保窗口不会拖拽到屏幕外
// 开始拖拽
startDrag(e) {
  e.preventDefault()
  this.isDragging = true
  this.dragStartX = e.clientX
  this.dragStartY = e.clientY
  this.windowStartX = this.x
  this.windowStartY = this.y
}

// 处理拖拽
handleDrag(e) {
  const deltaX = e.clientX - this.dragStartX
  const deltaY = e.clientY - this.dragStartY

  let newX = this.windowStartX + deltaX
  let newY = this.windowStartY + deltaY

  // 边界检测
  const maxX = window.innerWidth - this.width
  const maxY = window.innerHeight - this.height

  newX = Math.max(0, Math.min(newX, maxX))
  newY = Math.max(0, Math.min(newY, maxY))

  this.x = newX
  this.y = newY
}
调节窗口大小功能
窗口大小调节通过在窗口边缘添加控制点实现:
- 控制点布局:在窗口四边和四角添加不可见的控制点
- 方向识别:根据点击的控制点确定调节方向
- 尺寸计算:根据鼠标移动距离计算新的窗口尺寸
- 最小尺寸限制:确保窗口不会小于最小尺寸
// 开始调节大小
startResize(direction) {
  this.isResizing = true
  this.resizeDirection = direction
  this.resizeStartX = event.clientX
  this.resizeStartY = event.clientY
  this.resizeStartWidth = this.width
  this.resizeStartHeight = this.height
  this.resizeStartLeft = this.x
  this.resizeStartTop = this.y
}

// 处理调节大小
handleResize(e) {
  const deltaX = e.clientX - this.resizeStartX
  const deltaY = e.clientY - this.resizeStartY

  // 根据调节方向计算新的尺寸和位置
  switch (this.resizeDirection) {
    case 'se': // 右下角
      newWidth = this.resizeStartWidth + deltaX
      newHeight = this.resizeStartHeight + deltaY
      break
    // ... 其他方向的处理
  }

  // 应用最小尺寸限制
  newWidth = Math.max(this.minWidth, newWidth)
  newHeight = Math.max(this.minHeight, newHeight)
}
悬浮在其他组件之上
通过CSS的z-index属性实现悬浮效果:
.float-window {
  position: fixed;  /* 固定定位,脱离文档流 */
  z-index: 9999;    /* 高层级,确保在最上层 */
  background: #fff;
  border: 1px solid #ddd;
  border-radius: 6px;
  box-shadow: 0 4px 12px rgba(0, 0, 0, 0.15);
  user-select: none; /* 禁止文本选择 */
}
(二)悬浮按钮组件
悬浮按钮用于触发悬浮窗口的显示和隐藏。
<template>
  <div
    ref="floatButton"
    class="float-button"
    :style="buttonStyle"
    @click="toggleWindow"
    @mousedown="startDrag"
  >
    <i class="icon">{{ icon }}</i>
    <span v-if="showText" class="button-text">{{ text }}</span>
  </div>
</template>

<script>
export default {
  name: 'FloatButton',
  props: {
    icon: {
      type: String,
      default: '📊'
    },
    text: {
      type: String,
      default: '设备取数'
    },
    showText: {
      type: Boolean,
      default: true
    },
    initialX: {
      type: Number,
      default: 50
    },
    initialY: {
      type: Number,
      default: 200
    }
  },
  data() {
    return {
      x: this.initialX,
      y: this.initialY,
      isDragging: false,
      dragStartX: 0,
      dragStartY: 0,
      buttonStartX: 0,
      buttonStartY: 0,
      clickStartTime: 0
    }
  },
  computed: {
    buttonStyle() {
      return {
        left: this.x + 'px',
        top: this.y + 'px'
      }
    }
  },
  mounted() {
    document.addEventListener('mousemove', this.handleMouseMove)
    document.addEventListener('mouseup', this.handleMouseUp)
  },
  beforeDestroy() {
    document.removeEventListener('mousemove', this.handleMouseMove)
    document.removeEventListener('mouseup', this.handleMouseUp)
  },
  methods: {
    // 开始拖拽
    startDrag(e) {
      this.clickStartTime = Date.now()
      this.isDragging = false
      this.dragStartX = e.clientX
      this.dragStartY = e.clientY
      this.buttonStartX = this.x
      this.buttonStartY = this.y
    },

    // 鼠标移动处理
    handleMouseMove(e) {
      if (Math.abs(e.clientX - this.dragStartX) > 5 || Math.abs(e.clientY - this.dragStartY) > 5) {
        this.isDragging = true
      }

      if (this.isDragging) {
        const deltaX = e.clientX - this.dragStartX
        const deltaY = e.clientY - this.dragStartY

        let newX = this.buttonStartX + deltaX
        let newY = this.buttonStartY + deltaY

        // 边界检测
        const buttonWidth = this.$refs.floatButton.offsetWidth
        const buttonHeight = this.$refs.floatButton.offsetHeight

        newX = Math.max(0, Math.min(newX, window.innerWidth - buttonWidth))
        newY = Math.max(0, Math.min(newY, window.innerHeight - buttonHeight))

        this.x = newX
        this.y = newY
      }
    },

    // 鼠标释放处理
    handleMouseUp() {
      if (!this.isDragging && Date.now() - this.clickStartTime < 200) {
        // 如果没有拖拽且时间很短,认为是点击事件
        this.toggleWindow()
      }
      this.isDragging = false
    },

    // 切换窗口显示状态
    toggleWindow() {
      this.$emit('toggle-window')
    }
  }
}
</script>

<style scoped>
.float-button {
  position: fixed;
  background: linear-gradient(135deg, #667eea 0%, #764ba2 100%);
  color: white;
  border: none;
  border-radius: 25px;
  padding: 12px 16px;
  cursor: pointer;
  box-shadow: 0 4px 12px rgba(0, 0, 0, 0.15);
  z-index: 9998;
  user-select: none;
  display: flex;
  align-items: center;
  gap: 8px;
  transition: all 0.3s ease;
}

.float-button:hover {
  transform: scale(1.05);
  box-shadow: 0 6px 16px rgba(0, 0, 0, 0.2);
}

.icon {
  font-size: 18px;
}

.button-text {
  font-size: 14px;
  font-weight: 500;
}
</style>
四、使用示例
(一)在页面中使用组件
<template>
  <div class="page-container">
    <!-- 页面主要内容 -->
    <div class="main-content">
      <h1>设备取数页面</h1>
      <el-form>
        <el-form-item label="数值1">
          <el-input v-model="form.value1" placeholder="请输入或选择设备数据"></el-input>
        </el-form-item>
        <el-form-item label="数值2">
          <el-input v-model="form.value2" placeholder="请输入或选择设备数据"></el-input>
        </el-form-item>
      </el-form>
    </div>

    <!-- 悬浮按钮 -->
    <FloatButton
      icon="📊"
      text="设备取数"
      @toggle-window="toggleDeviceWindow"
    />

    <!-- 悬浮窗口 -->
    <FloatWindow
      v-if="showDeviceWindow"
      title="设备取数数据"
      :initial-width="500"
      :initial-height="400"
      @close="closeDeviceWindow"
      @minimize="minimizeDeviceWindow"
    >
      <!-- 设备数据列表 -->
      <div class="device-data-list">
        <el-table :data="deviceData" @row-click="selectDeviceData">
          <el-table-column prop="timestamp" label="时间" width="150"></el-table-column>
          <el-table-column prop="deviceId" label="设备ID" width="100"></el-table-column>
          <el-table-column prop="value" label="数值"></el-table-column>
          <el-table-column prop="unit" label="单位" width="80"></el-table-column>
        </el-table>
      </div>
    </FloatWindow>
  </div>
</template>

<script>
import FloatButton from '@/components/FloatButton.vue'
import FloatWindow from '@/components/FloatWindow.vue'

export default {
  name: 'DeviceDataPage',
  components: {
    FloatButton,
    FloatWindow
  },
  data() {
    return {
      showDeviceWindow: false,
      form: {
        value1: '',
        value2: ''
      },
      deviceData: [
        {
          timestamp: '2024-08-29 10:30:15',
          deviceId: 'DEV001',
          value: '25.6',
          unit: '°C'
        },
        {
          timestamp: '2024-08-29 10:31:20',
          deviceId: 'DEV001',
          value: '26.1',
          unit: '°C'
        }
        // ... 更多数据
      ]
    }
  },
  methods: {
    // 切换设备窗口显示
    toggleDeviceWindow() {
      this.showDeviceWindow = !this.showDeviceWindow
    },

    // 关闭设备窗口
    closeDeviceWindow() {
      this.showDeviceWindow = false
    },

    // 最小化设备窗口
    minimizeDeviceWindow() {
      this.showDeviceWindow = false
    },

    // 选择设备数据
    selectDeviceData(row) {
      // 将选中的数据填入表单
      if (!this.form.value1) {
        this.form.value1 = row.value
      } else if (!this.form.value2) {
        this.form.value2 = row.value
      }

      // 提示用户
      this.$message.success(`已选择数据:${row.value} ${row.unit}`)
    }
  }
}
</script>

<style scoped>
.page-container {
  padding: 20px;
}

.main-content {
  max-width: 800px;
  margin: 0 auto;
}

.device-data-list {
  height: 300px;
  overflow-y: auto;
}
</style>
(二)组件注册
在main.js中全局注册组件:
import { createApp } from 'vue'
import App from './App.vue'
import FloatButton from '@/components/FloatButton.vue'
import FloatWindow from '@/components/FloatWindow.vue'

const app = createApp(App)

// 全局注册悬浮组件
app.component('FloatButton', FloatButton)
app.component('FloatWindow', FloatWindow)

app.mount('#app')
五、功能特点
(一)技术特点
- 完全自定义:不依赖第三方组件库,完全可控
- 响应式设计:支持不同屏幕尺寸的适配
- 事件驱动:通过事件通信,组件间解耦
- 性能优化:使用计算属性和事件委托优化性能
(二)用户体验
- 直观操作:拖拽和调节大小操作符合用户习惯
- 视觉反馈:鼠标悬停和拖拽时的视觉效果
- 边界保护:防止窗口拖拽到屏幕外
- 最小尺寸限制:确保窗口内容可见
(三)扩展性
- 插槽支持:窗口内容完全可定制
- 事件机制:支持自定义事件处理
- 样式定制:CSS变量支持主题定制
- 配置灵活:丰富的props配置选项
六、总结
通过实现这个悬浮窗口组件,我们解决了设备取数功能中的用户体验问题。该组件具有以下优势:
- 独立性强:悬浮窗口不会阻塞页面其他操作
- 交互友好:支持拖拽移动和大小调节
- 复用性好:组件化设计,可在多个页面复用
- 扩展性强:通过插槽和事件支持各种定制需求
这种设计模式特别适用于需要在不影响主要工作流程的情况下,提供辅助功能的场景。在实际项目中,可以根据具体需求对组件进行进一步的优化和扩展。
参考资料
- Vue.js官方文档 - 组件开发指南
- MDN Web Docs - 鼠标事件处理
- CSS-Tricks - 拖拽功能实现
- Vue可拖拽缩放组件教程:vue-draggable-resizable 使用指南
1 - 页面悬浮按钮可拖动实现(vue2和vue3写法)
2